
I spent two weeks learning ALL about Landforms and we had a BLAST! My students were full of knowledge by the end of the two weeks and they were eager for more!!

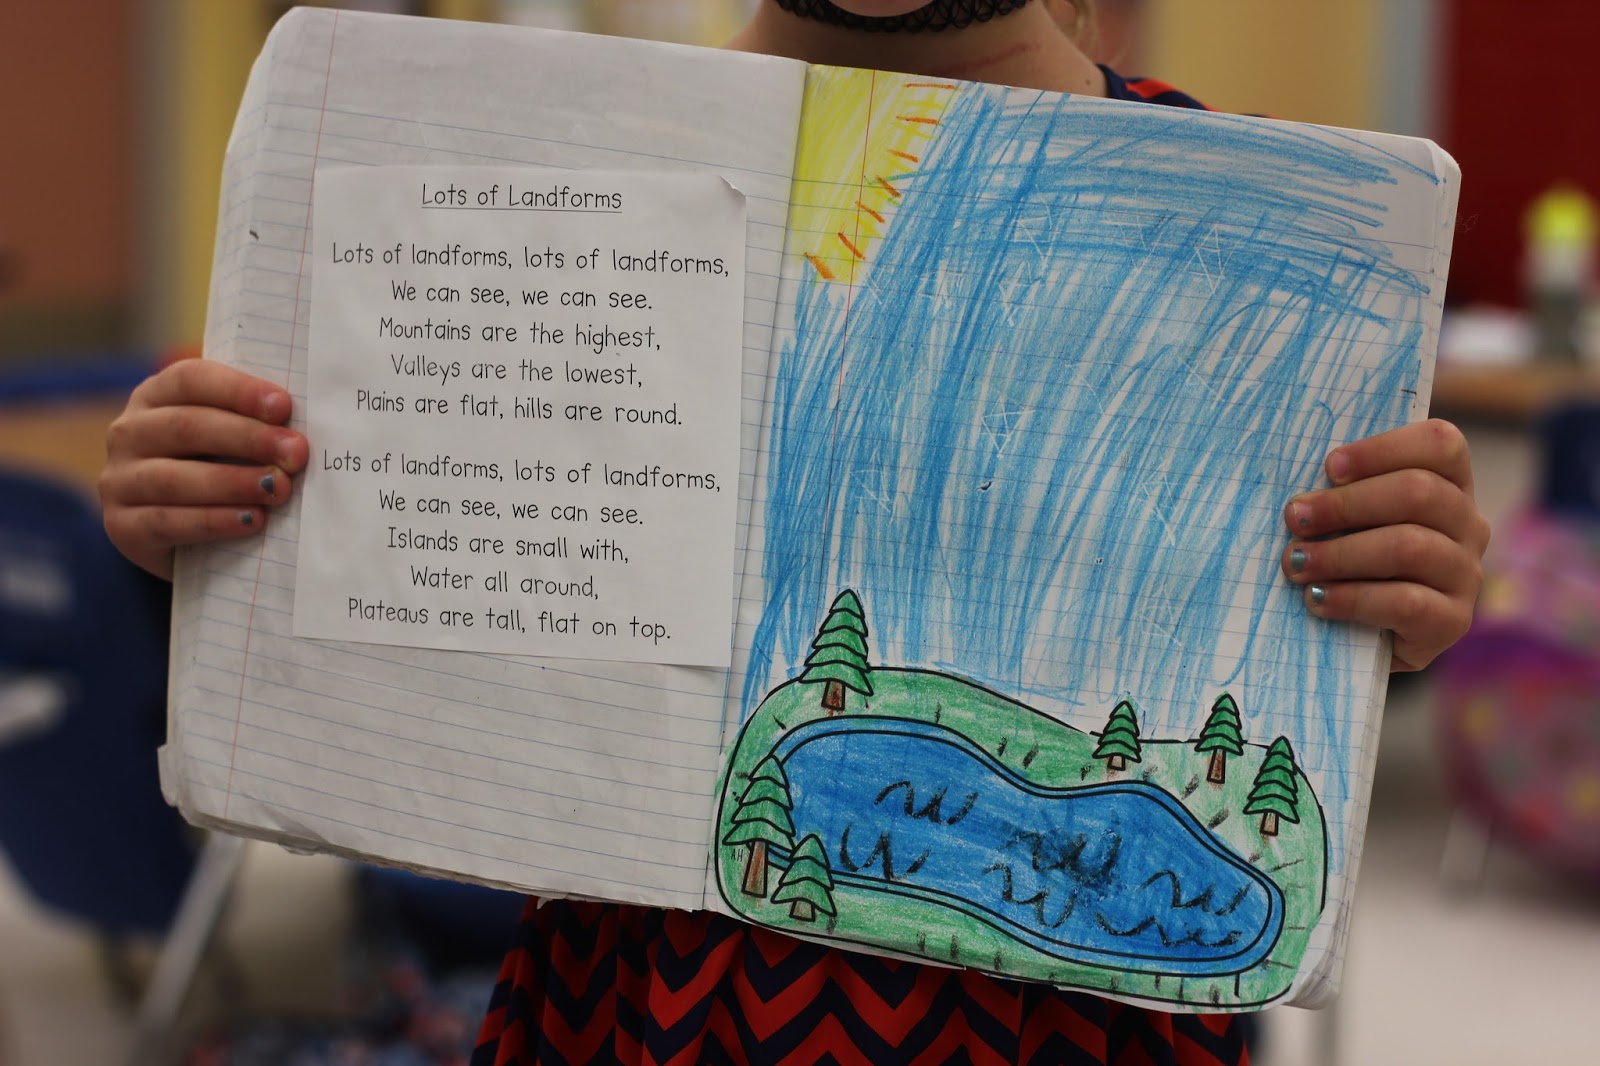
I added a landform poem into my Poetry pack. We made hand movements for the different landforms (ex. for mountains we put our arms up into a point, for hills we put our arms up but made sure they were rounded).

When we were ready to add the poems into our notebooks I let the children choose which landform image they wanted. Most students chose their favorite one they learned about which was fun!
So, how did I teach this unit? Every day we learned two different landforms. I gathered books and YouTube videos to help me teach. After we read a book/watched a video I had students raise their hands and tell me some items that they learned. We made a T-Chart on our whiteboard full of facts on the two different landforms from that day.

Then I sent the children back to their seats. I have four tables in my room. I gave each table a piece of paper and assigned them a landform (we did this daily- so on the first day I taught volcanos and mountains, two tables had to make a poster on volcanos and two tables made a poster on mountains).

They had to work together to add a title, facts, and an image. They had free range to any art materials in our room. They just had to ask and I would take it out for them!

I've done so many collaborative activities throughout the year that my students are pros on assigning each other jobs and taking on different responsibilities. For instance, someone made the title and another colored it in. They took turns making the lines for the facts and writing them. They even took turns cutting, painting, or drawing the landform images.

As the groups finished making their poster daily, they would present it. We made sure they had a title, facts, and an image and if they did, we would applaud and celebrate the group.

The landforms we learned were:
Monday- Volcanos/Mountains
Tuesday-Oceans/Lakes
Wednesday-Waterfall/River
Thursday-Desert /Hill
Friday- Review day
Week 2:
Monday-Valley/Plateau
Tuesday-Island/Peninsula
Wednesday-Plain/Canyon
Thursday-Landforms wrap up (formal observation)
Friday- Build landforms at our sand park/landform cooking activity

The first day they made their posters they needed a lot more assistance. I offered some ideas on how to create the image and I helped them a little bit on assigning each other jobs.

But, as the two weeks progressed they were so excited to get started and they didn't need me at all!! You can see the group in the image above even asked if they could go outside to get sand from our park to use in their desert! LOVE it!

These looked amazing hanging in my room! I hung them all up on our clothesline.

Some of the books and YouTube videos that I used can be found by clicking on the links below (there were some days that I didn't have THAT much info, but we got by!) Also, there is a great landform rap on Flocabulary if you have an account and a great book to start off the unit with HERE:
Peninsula: Book and I didn't find a great informational video but I did show them this as an example

Then it was time for my formal observation! (This observation follows the same guidelines I've posted about before, just a different topic and activity. You can read more detail in that post.) At this point we had already learned about 14 different types of landforms! To start off the lesson I asked my students how they felt about their knowledge on landforms. I have a scale on my whiteboard that we use during non-fiction units--it is a scale from 0-4, 0 being I don't feel like I am doing well and 4 being I am an expert and can even help a friend! Most of my students said they were at a 3 so I said to them, let's try to get to a 4 today! I think we can do it!
We went over the directions of the lesson as a class and I reminded them of the rules we use doing cooperative work. Then we made a quick rubric together (ex. everyones project will have a title, a picture, be colored, and at least 4 facts)
I paired the students up into groups of 2 or 3 and called each group up to choose a landform.
 They secretly chose one by reaching their hand into a bucket and pulling one out--they weren't allowed to show anyone! So they took their little piece of paper with them and got to work on their landform riddle!
We went over the directions of the lesson as a class and I reminded them of the rules we use doing cooperative work. Then we made a quick rubric together (ex. everyones project will have a title, a picture, be colored, and at least 4 facts)
I paired the students up into groups of 2 or 3 and called each group up to choose a landform.


I had the white paper pre-folded as you can see above. The students wrote their landform underneath the flap and then kept the paper folded so no one would be able to see the title OR the picture! (When the paper is folded down all you can see are the 4 clues and the question.)

When each group was finished, we gathered at the carpet. We quickly went over the presentation rules (listen attentively, celebrate other groups, etc). I called one group at a time to stand up and present. They read their clues and then had to call on classmates to try and guess what landform they were referring to. The kids LOVED this!


I mean look at this independent work! I was so proud! I could also tell my principal was beyond impressed. He was taking a ton of photos!

Then I told my students I was going to make sure they knew their landforms on their own by giving them one more activity sheet challenge! My students all had a huge smile on their face when I told them it was a 'challenge'. They love impressing me and knew they could do this!

They all completed their activity sheet independently and all got a 100%! We went back to our learning scale and did another status check to see where they felt they were now. The whole class said they were at a '4' and I totally agreed!

This lesson went a little over the allotted time for our observation so my principal didn't see that final challenge or the reference back to the learning scale, but that is okay!! Things don't always go perfectly and I know he saw enough to be happy :)
You can grab the formal observation activities HERE.


