Saturday, January 27, 2018

Valentine's Day Craft

I wanted to make a cute Valentine's craft with the kids so that they would be able to give them out as gifts, well they turned out SO cute that I thought I just had to share them with you all! These would make amazing parent gifts and they were so easy to complete!
We started off by drawing a picture with a thin Sharpie pen.  I let my little one choose who she wanted to draw herself with (she made a couple of boxes). She drew herself with mom, dad, grandma, etc.  If you are doing this as a Valentine's gift in class you can even let your students draw their whole family.
Then we colored in the picture with colored pencils
Meanwhile, I painted a layer of Mod Podge onto the ceramic box from Oriental Trading.
Mod Podge dries very quickly so make sure the image is ready to lay on top.
Once the image was placed on the box, I added another layer of Mod Podge. This just ensures that the picture will stay on the box and it also adds a nice shine finish!
Then we decorated our boxes with stickers. I ordered a TON of fun stickers from Oriental Trading (fun fact--I am a total sticker hoarder).
We added one sticker into the inside of the box and I painted over it with Mod Podge. 
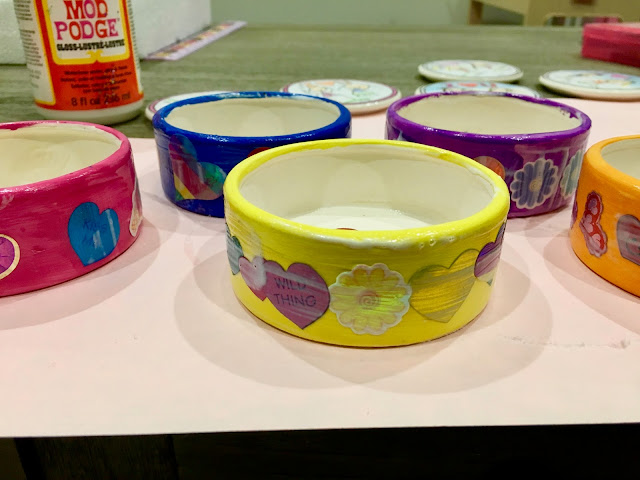
Then we painted the outside of the box. I left out a bunch of different colored paints to choose from. This is just the Crayola paint (washable). The paint dried very quickly (probably within 15 minutes).
Then we used our awesome stickers from Oriental Trading to decorate the outsides of the boxes. They turned out adorable!!! I covered the stickers with another layer of Mod Podge (the Mod Podge dries within 5 minutes).
I LOVE how they turned out!
Such an awesome gift and so easy to make!
I made 12 boxes for about $30. So it would be about $2.50 per child in your class.
If you want to add a card with your gift and you still have leftover stickers, these are my favorite! They are not only cute cards, but they make for cute keepsakes!
Don't forget to pin the image below!
SaveSaveSaveSaveSaveSave
SaveSave

Monday, January 22, 2018

Winter Center Activities

Word Work is the easiest center for me to set up.  I prepped these centers 5 years ago and I store them by month in a 2 gallon zip-lock bag.  My monthly word work centers build upon each other so when I pull out the new centers for the month, they require very little to no explanation. Students already know exactly what to do and what my expectations are!
Now, just because these centers are titled 'Word Work Centers' does not mean they can only be used at that center! Some of these activities are great in guided reading groups, as early finishers, or even in morning tubs! 
Syllables are a skill that I am still working on with my kids. They tend to stretch the word out too much and try to create extra syllables.  We actually did this activity together in reading group before I left it out for independent center work.
As most of you know, magnetic letters are always a hit in my room and this word family center was no different. I looked up to check on my kiddos and loved how they used dry erase markers for all of the letter a's without me giving them that idea. Made me smile :)
We are definitely doing a lot of CVC work lately and sorted our word family CVC words in our pocket chart as well.
 Then kids had to cut and paste their words onto their activity sheet.  I have an activity sheet option for every center in my word work pack; however, they are totally optional. Sometimes I use them and sometimes I don't!
We worked on really stretching the CVC word in order to hear that middle sound. My kids are doing fantastic with this!
 In 'Penguin Pairs' students had to match the rhyming penguins together and then choose four to record on their activity sheet. 
 I also used these same penguin rhyming cards to play a couple of rhyming games during my guided reading groups.  My students love playing games with me and totally forget that they are learning! We played 'slap the rhyme' together--I put half of the cards all of the reading group table and the other half I kept in my hands.  I would turn one card over for the group to see and they had to 'slap' the rhyming match when they found it on the table.  We had lots of laughs with that one!
I left this center out at the magnetic letter center just to kind of see how my students would do. Let me tell you...they are just amazing! My kids did so great listening to the beginning blends! There was also a 'helper' card left at the center in case they got stuck on any.
 We are always working on sight words in our room and my kids had a blast with this 'Sight Word Party' dice game.  They like predicting the sight word winner too (at the top of their page). I can hear them cheering on their sight word that they predicted throughout the entire center time, haha.
Again, we are reallllly working on those CVC words.  In this center students sorted their words by real/nonsense words.
Then they recorded some of their words on their activity sheet and used one of their real words in a sentence.
The last two centers I am going to share are both building sentences centers. In the first one students sort their cards based on the picture at the top. Then, with those cards, they have to unscramble the sentence.  I always reinforce that the capital letter goes first and the punctuation goes last.  This really helps those kids that may struggle with this center.
The second center that focuses on building sentences is a little different.  I didn't chop my words apart too much, so you can cut yours up and make this more difficult if you wanted.  There are two sentences starters, 'Here is my...' and 'Will you...with me?' Then, students use their picture cards to complete the sentences.
 When they are done they grab a pointer and read their sentences, checking to make sure that they all make sense. If they do, they pick four sentences to record.
Whew! Lots of activities going on in our classroom this week! All of the centers in this post can be found in my January Word Work pack
If you need more centers for winter you can check out my Winter Literacy Centers pack for similar activities!
Don't forget to PIN these centers with the image below!
Happy Monday!!
SaveSave

Thursday, January 18, 2018

Penguin Craft (Informational)

We LOVE learning about Penguins!! It may be one of my favorite units to teach too.  As we read our informational penguin books, we add all of our learned info onto a KWL.
I ask my kids questions from the KWL every morning before we read another book to make sure that they are remembering all of the info that they have learned. For instance, 'raise your hand if you can tell me three different things that penguins eat.' My kids LOVE showing what they know!!
So we decided to make this cute informational penguin so students can really show off everything that they have learned!
We make one page a day so students don't rush through their work. 
Then when we are done, we staple our books onto the belly of our penguin craft.
These cute penguins make an amazing bulletin board display. We have gotten so many compliments from not only fellow teachers (who are very impressed with our work) but our principal too!
You can grab this informational penguin craft by clicking on the image below.
You can also grab this similar informational bear craft.